Multi-language Blog with Quarto - Guide
Quarto is a very useful tool.
With Quarto, you can accomplish almost anything.
Naturally, it can be used for statistical analysis, its original purpose, but it can also be used for websites, apps, blogs, and document work.
I became interested in Quarto while studying R and statistics, but recently, as I’ve delved deeper into Quarto, I’ve started to pay attention to things other than important statistics and R, which I slightly regret. :)
Anyway, my recent project involved using Quarto to implement a multi-language Blog (or bilingual blog).
As I first imagined, when viewing an English post, clicking the ‘한국어’ button should have immediately switched to a Korean post.
Sadly, it didn’t turn out exactly as I imagined. Instead of switching posts, clicking the ‘한국어’ button takes you to the Korean home page, where you can enjoy Korean content.
Still, the process of creating it was quite challenging for me, who had no understanding of Quarto, YAML, blog structure, or publishing.
I write this post to provide a guide that might help others who may go through a similar process.
This article draws heavily from Mario Angst’s ‘A multi-language (German/ English) Quarto website’ and follows the approach he implemented.
If there are any shortcomings in this article, adopting Mario Angst’s method would be an effective solution.
This guide does not start with creating a blog from scratch.
For those who haven’t started making a blog, please follow the guide on Quarto’s official website.
However, it might be helpful to read through the materials below before following the Quarto official website guide to reduce trial and error.
0. Materials
RStudio
This guide proceeds using RStudio. Quarto can also be used with other IDEs like Jupyter Notebook or VS Code. I am using RStudio version 2023.06.
Quarto
Obviously, Quarto is needed. However, it’s advisable to match the version before following the guide. Quarto undergoes many fixes and updates, so operation can vary depending on the version.
If you need to install it, check the Quarto Official Document.
You can check the version of Quarto by typing quarto check in the terminal:
(...)

[✓] Checking versions of quarto dependencies......OK
[✓] Checking Quarto installation......OK
      Version: 1.3.353

(...)
Netlify
I chose Netlify because:
- Many users use it, and
- It integrates well with GitHub.
Especially, the service where Netlify automatically carries out building and deploying simultaneously with GitHub commits was exactly the killer product I wanted.
However, due to the imperfections(?) of Quarto, you have to use the command line to deploy on Netlify in the way you want using the project profile.
However, despite the unfortunate circumstance, the command line method is intuitive, and I am very satisfied with it now.
In this guide, I use Netlify, so I recommend beginners to use Netlify as well.
Also, when deploying on Netlify, I will use the command line input method, so please do not set up other plugins or GitHub actions.
If you use Netlify plugins or GitHub actions, the blog may not operate as intended with each commit.
1. The Big Picture
Before I begin the explanation, I will briefly overview how I implemented the Korean-English blog.
Knowing the flow will make the following explanations easier to understand.
I will explain in a reverse order, starting from the final product (deployment).
1.1 Netlify Deployment
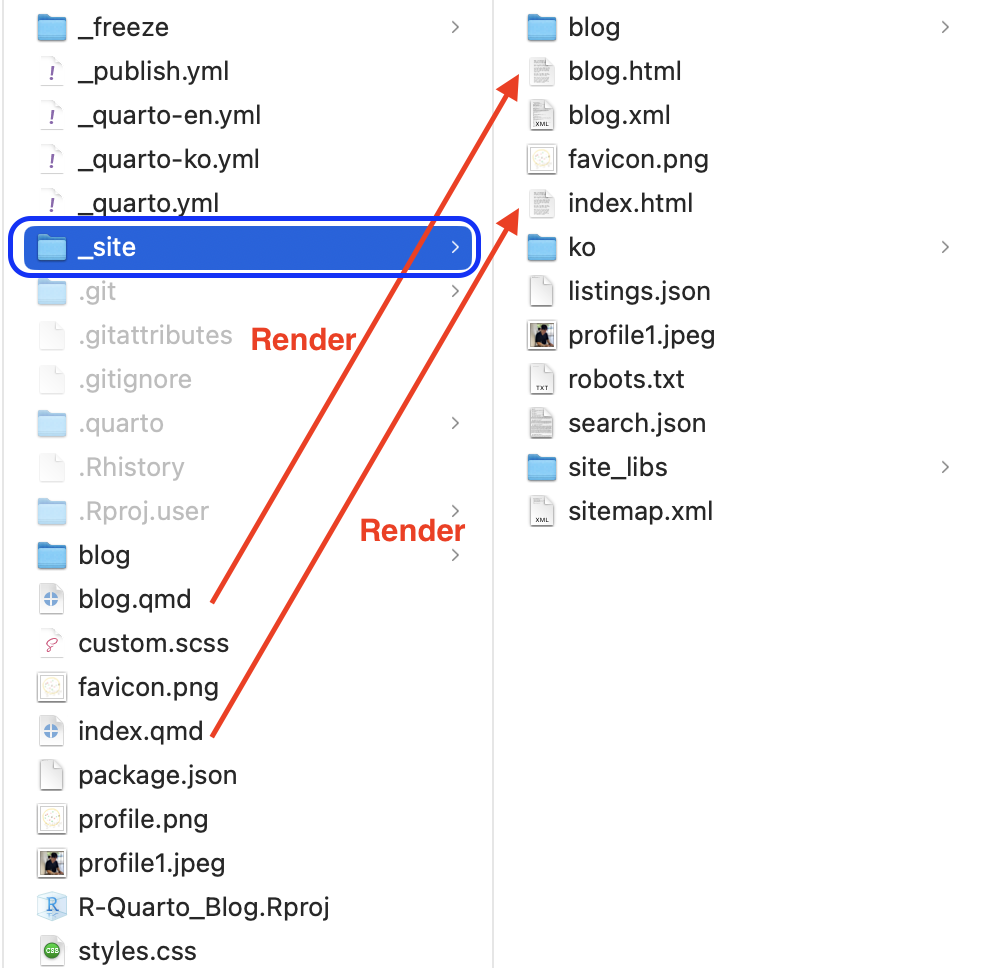
We send the output in the _site folder to Netlify.
Netlify receives the output, uploads it to the server, and deploys it.
Then, how do we create the output in the _site folder?
1.2 Creating Output in the _site Folder
Quarto renders qmd files (cmd+shift+k) and creates output in the _site folder applying pre-set options.
For example, if you render the index.qmd file in the root workspace, It creates an index.html file in the _site folder, considering the _site folder as the new root folder..
This index.html file becomes the main page when you enter the blog at https://oooo12.ooo.
Let’s give another example.
I created a blog folder in the root folder, and this blog folder contains posts (e.g., another only post on my blog, hypothesis testing (1), is in the blog folder).
Then, I create a hypothesis-testing-1 folder in the blog folder and create an index.qmd inside it (this is different from the previously mentioned index.qmd, only the name is the same).
After writing content in this index.qmd and rendering it, a hypothesis-testing-1 folder is created inside the blog folder in the _site folder, and an index.html file is created within it.

This index.html file will appear at https://oooo12.ooo/blog/hypothesis-testing-1/ when deployed.
1.3 Creating Two Versions for English and Korean
If you, like me, want to operate a multilingual blog, you must create two versions of html files for each post, one in English and one in Korean.
For example, https://oooo12.ooo/blog/hypothesis-testing-1/ is in English, but https://oooo12.ooo/ko/blog/hypothesis-testing-1/ is in Korean.
This is because the English version of the hypothesis testing (1) post exists in root/blog/hypothesis-testing-1/index.html (meaning inside the index.html in the hypothesis-testing-1 folder in the blog folder in the root folder), and
The Korean version of the hypothesis testing (1) post is in root/ko/blog/hypothesis-testing-1/index.html.
Normally, you would have to write two html files to introduce a post in two languages, but with Quarto’s project profile feature, you only need to write one qmd file.
1.4 project profile
Project profile has a feature that allows content to be visible or not visible depending on the situation.
This ultimately means that Quarto can render differently depending on the situation.
For this, you need to set up profiles in YAML, and mark the content inside the qmd file to distinguish what to show and not show depending on the profile (we’ll look into this in more detail later).
1.5 Content-Visible When-Profile
To compose content visible per profile, you must use ::: {.content-visible when-profile="ko"}.
It’s so well-coded that it doesn’t need more explanation, but to put it simply, it means to show content when the profile is ko.
It is used as follows:
::: {.content-visible when-profile="en"}
Statistical hypothesis testing, when explained plainly, means to "test a statistical hypothesis."

To understand hypothesis testing, it's necessary to know exactly what a 'statistical hypothesis' is.
:::

::: {.content-visible when-profile="ko"}

통계적 가설 검정을 그대로 풀어보면, "'통계적 가설(statistical hypothesis)'을 '검정(test)'한다"이다.

가설 검정을 이해하려면 '통계적 가설'이 무엇인지 정확히 아는 것이 필요하다.
:::
2. Configuring YAML
Let’s get into it.
YAML adjusts the overall options in Quarto.
Of course, you can decide whether to adjust the overall options or just specific directories.
However, this background knowledge is not necessary for this project configuration, so it’s omitted.
For more details, see quarto - Project Profile document.
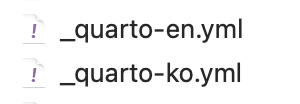
When you first create a blog, you use two YAML files in the root folder.
You will use the _quarto.yml file and the _publish.yml file, but the key is the _quarto.yml file.
_quarto.yml contains settings for the website, navbar, format, etc.
We will move all these settings to the profile YAML.
For that, you need to create a profile YAML.
If you name the profile in the YAML as ‘en’ (all English blog related settings will be done in the en profile from now on), you need to create a _quarto-en.yml in the root folder where _quarto.yml exists.
You must name the file _quarto-en.yml.
If you name it _quarto.en.yml, it won’t be recognized as a profile.
This is due to a change in the rules for naming files in updates.
There should also be a Korean profile.
Similarly, create _quarto-ko.yml in the root folder where _quarto.yml exists.
If you want both blogs to have the same blog format, you can copy and paste the settings in _quarto.yml into both ymls.
However, let’s write down the important YAML at the top of each yml.
Put the following code in _quarto-en.yml.
project:
output-dir: ./_sitePut the following code in _quarto-ko.yml.
project:
  output-dir: ./_site/ko
As you may have guessed, output-dir sets the directory address where the output is generated.
Thus, the results corresponding to the en profile will be created in the _site folder, and the results corresponding to the ko profile will be created in the _site/ko folder.
So, how should _quarto.yml be composed?
project:
  type: website

profile:
  default: en
  group:
    - [en, ko]

execute:
  freeze: auto
The _quarto.yml, which can be seen as the big brother, should set the options used commonly in all profiles, and the profile group.
In fact, if you have well configured and understood the yml file, you are almost done.
Now, let’s work on the qmd file.
3. Creating Outputs for Each Profile from a Single qmd
As an example, I will use root/blog/hypothesis-testing-1/index.qmd, which is my first posting at https://oooo12.ooo/blog/hypothesis-testing-1/.
First, let’s look at the index.qmd file.
---
title: "Hypothesis Testing (1)"

(...YAML...)

---

::: {.content-visible when-profile="en"}

Statistical hypothesis testing, when explained plainly, means to "test a statistical hypothesis."

To understand hypothesis testing, it's necessary to know exactly what a 'statistical hypothesis' is.

:::

::: {.content-visible when-profile="ko"}

통계적 가설 검정을 그대로 풀어보면, "'통계적 가설(statistical hypothesis)'을 '검정(test)'한다"이다.

가설 검정을 이해하려면 '통계적 가설'이 무엇인지 정확히 아는 것이 필요하다.

:::
As previously stated, using ‘::: {.content-visible when-profile=“ko”}’ shows the content only when the profile is ko.
Therefore, the part (‘::: {.content-visible when-profile=“ko”} ~~ this part ~~ :::’) applies the options set in the previously configured _quarto-ko.yml.
Thus,
통계적 가설 검정을 그대로 풀어보면, "'통계적 가설(statistical hypothesis)'을 '검정(test)'한다"이다.

가설 검정을 이해하려면 '통계적 가설'이 무엇인지 정확히 아는 것이 필요하다.
This part will only be rendered in index.html in a subdirectory of _site/ko.
Specifically, it will be stored in ’root/_site/ko/blog/hypothesis-testing-1/index.html’.
Now you must have figured out how to use it.
The part that should appear in the English blog should be placed between
::: {.content-visible when-profile="en"}


:::
and the part that should appear in the Korean blog should be placed between
::: {.content-visible when-profile="ko"}


:::5. Netlify Deployment
There are generally four ways to deploy Netlify using Quarto.
Among them, Publish Command, that is, the method using the command line, seems to be the only way to check the profile feature. (It might be due to my lack of skills. If there is a better way, please leave a comment anytime.)
5.1 Rendering
Rendering is done for each profile, with the en profile rendering to the parent folder (root) first and the ko profile rendering to the subfolder (/ko) next.
The command to render the en profile is as follows.
Enter it in the terminal.
quarto render --profile enNext, enter the command to render the ko profile.
quarto render --profile koNow, if you look in the root/_site folder, you will see the files rendered by the en profile and the ko folder rendered by the ko profile.
5.2 Deployment
You need to send the rendered folder to the Netlify server for Netlify to deploy it.
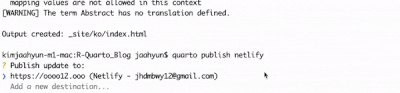
quarto publish netlifyThe result is as follows.
kimjaahyun-m1-mac:R-Quarto_Blog jaahyun$ quarto publish netlify
? Publish update to:
❯ https://oooo12.ooo (Netlify - jhdmbwy12@gmail.com)
  Add a new destination...
Pressing enter will automatically deploy it.